> ## Documentation Index
> Fetch the complete documentation index at: https://subscriptions-docs.getappfox.com/llms.txt
> Use this file to discover all available pages before exploring further.
# Customer portal
> Configure the self-service customer account extension
The customer portal is a Shopify customer account UI extension that lets your subscribers manage their subscriptions. Customers can view upcoming orders, update settings, and make changes without contacting support.
 ## What customers can do
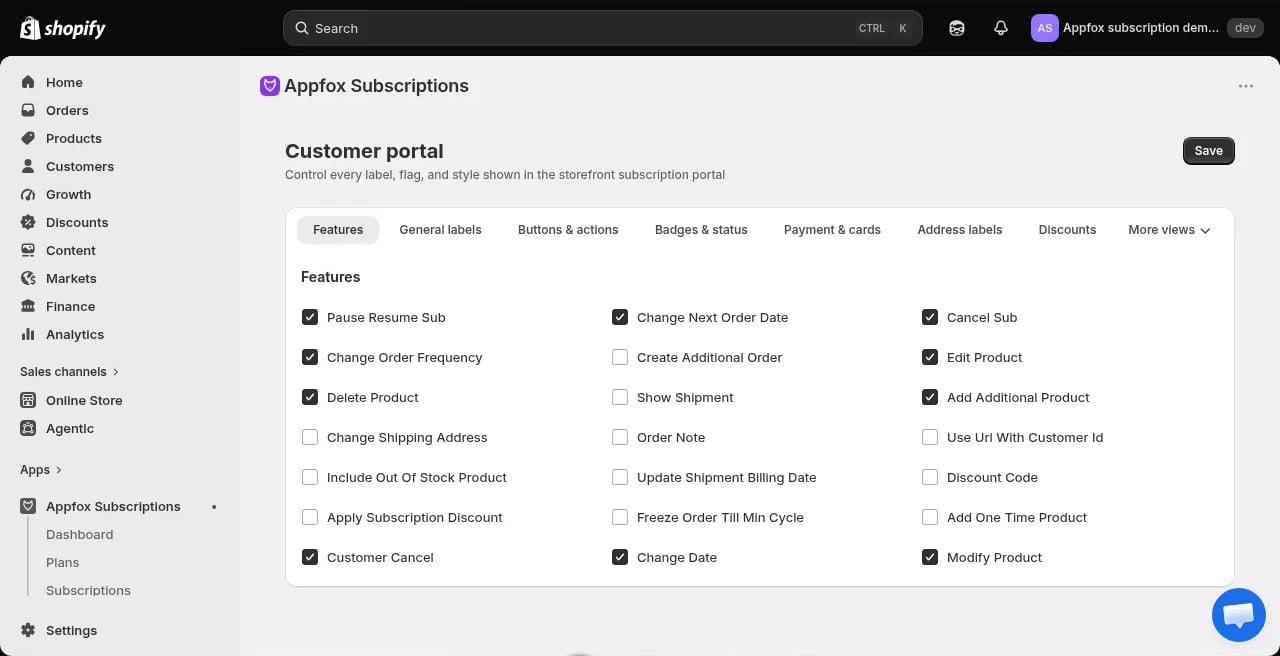
You control which features are available in the customer portal. Enable or disable features based on what you want customers to manage themselves.
### Subscription management
Two critical toggles control subscription lifecycle actions:
* **Pause/Resume subscription** — When enabled, customers can pause their subscription and later resume it. When disabled, customers cannot pause or resume.
* **Cancel subscription** — When enabled, customers can cancel their subscription through the portal. When disabled, the cancel button is hidden and customers must contact you to cancel.
These toggles are independent. You can enable pause without allowing cancel, or vice versa.
If a plan also has **Minimum cycles before customer cancel** set, the portal blocks cancel until that many billing cycles have completed. Merchant admin cancels and the Enterprise contract API are not affected.
If you disable customer cancellation, make sure your support team is prepared to handle cancellation requests. Some jurisdictions require you to offer an easy cancellation method.
### Additional features
Other available features include:
* **Change order frequency** — Let customers adjust their billing frequency
* **Change next order date** — Allow customers to reschedule their next billing
* **Swap product** — Enable customers to swap products in their subscription
* **Edit product** — Let customers edit product details or quantities
* **Add products** — Allow customers to add new products to their subscription
* **Remove products** — Let customers remove products from their subscription
* **Skip next order** — Enable customers to skip an upcoming billing cycle
* **Update payment method** — Allow customers to update their payment information
## Configure portal features
Click **Customer portal** in the app navigation.
On the **Features** tab, toggle each feature on or off. Enabled features appear in the customer portal.
For features that require additional setup, click **Configure** to set parameters like minimum order counts or allowed product categories.
Click **Save** to apply the configuration. Changes take effect immediately.
The customer portal is a Shopify customer account extension, not a standalone URL. Customers access it by logging into their customer account on your store.
## Portal tabs
The customer portal organizes features into tabs:
* **Features**: Enable or disable specific self-service actions
* **Button actions**: Configure button labels and behaviors
* **Images & colors**: Customize the portal appearance to match your brand
* **Layout & wording**: Adjust text and layout options
## Balancing self-service and support
Enabling more features gives customers more control but may reduce the need for direct merchant involvement. Consider your support capacity and customer preferences when choosing which features to enable.
For products that require careful curation or expert guidance, you might disable product swapping. For simple subscriptions, enabling all features reduces support volume.
Start with a few core features enabled and expand based on customer feedback. Monitor support requests to see which features customers ask about most.
## What customers can do
You control which features are available in the customer portal. Enable or disable features based on what you want customers to manage themselves.
### Subscription management
Two critical toggles control subscription lifecycle actions:
* **Pause/Resume subscription** — When enabled, customers can pause their subscription and later resume it. When disabled, customers cannot pause or resume.
* **Cancel subscription** — When enabled, customers can cancel their subscription through the portal. When disabled, the cancel button is hidden and customers must contact you to cancel.
These toggles are independent. You can enable pause without allowing cancel, or vice versa.
If a plan also has **Minimum cycles before customer cancel** set, the portal blocks cancel until that many billing cycles have completed. Merchant admin cancels and the Enterprise contract API are not affected.
If you disable customer cancellation, make sure your support team is prepared to handle cancellation requests. Some jurisdictions require you to offer an easy cancellation method.
### Additional features
Other available features include:
* **Change order frequency** — Let customers adjust their billing frequency
* **Change next order date** — Allow customers to reschedule their next billing
* **Swap product** — Enable customers to swap products in their subscription
* **Edit product** — Let customers edit product details or quantities
* **Add products** — Allow customers to add new products to their subscription
* **Remove products** — Let customers remove products from their subscription
* **Skip next order** — Enable customers to skip an upcoming billing cycle
* **Update payment method** — Allow customers to update their payment information
## Configure portal features
Click **Customer portal** in the app navigation.
On the **Features** tab, toggle each feature on or off. Enabled features appear in the customer portal.
For features that require additional setup, click **Configure** to set parameters like minimum order counts or allowed product categories.
Click **Save** to apply the configuration. Changes take effect immediately.
The customer portal is a Shopify customer account extension, not a standalone URL. Customers access it by logging into their customer account on your store.
## Portal tabs
The customer portal organizes features into tabs:
* **Features**: Enable or disable specific self-service actions
* **Button actions**: Configure button labels and behaviors
* **Images & colors**: Customize the portal appearance to match your brand
* **Layout & wording**: Adjust text and layout options
## Balancing self-service and support
Enabling more features gives customers more control but may reduce the need for direct merchant involvement. Consider your support capacity and customer preferences when choosing which features to enable.
For products that require careful curation or expert guidance, you might disable product swapping. For simple subscriptions, enabling all features reduces support volume.
Start with a few core features enabled and expand based on customer feedback. Monitor support requests to see which features customers ask about most.